Now that you have Nagios installed (See last week’s article: “Monitoring Your Systems with Nagios” ), you are ready to begin monitoring services such as ssh, websites, and other services. So that brings us to the purpose of this week’s article: How to Configure Nagios Hosts and Services. To do this, we have two general tasks:
- Create a file with host and service definitions for the host that we intend to monitor and
- edit the nagios.cfg file to tell it about our new file containing the host and service definitions.
Define New Files and Directories in the Nagios.cfg File
Let’s start by editing the nagios.cfg. If you installed with me using last week’s article: “Monitoring Your Systems with Nagios”, then your nagios.cfg file will be located at: /usr/local/nagios/etc/nagios.cfg. We will edit it and file the location where the other cfg_file and cfg_dir definitions are located and add these lines:
cfg_file=/usr/local/nagios/etc/objects/hostgroups.cfg
and
cfg_dir=/usr/local/nagios/etc/objects/hosts
Define Nagios Hostgroups
Now, we need to create a hostgroup to put our hosts in. Hostgroups allow us to group our hosts by OS, by service they provide, by location, etc… In this case, I will just make one hostgroup named: webservers and put my one host in it.
We defined the location of our hostgroup file above in the nagios.cfg file. Let’s change to that location now:
cd /usr/local/nagios/etc/objects
Create the hostgroups.cfg file:
define hostgroup{
hostgroup_name webservers
alias Very Important WebServers
}
Later, we can define any other hostgroups that we want to use for our organizational efforts in this same file.
Define or Configure Nagios Hosts and Services
With the hostgroup defined, let’s define our host. We defined a directory above to put our host definitions in the nagios.cfg file. We can put all of our host definitions in this directory. The only requirement now is that the files end with a .cfg extension. Let’s now create it and change into it:
mkdir /usr/local/nagios/etc/objects/hosts; cd /usr/local/nagios/etc/objects/hosts
The next step in our task to Configure Nagios Hosts and Services is the host definition.
Now, we create a file for our host definition. Typically, I put the service definitions for my host in the same file as the host itself. Create a filename to define your host. The filename must have a .cfg extension. In my case it is named: uptimemadeeasy.cfg
define host{
use linux-server
host_name uptimemadeeasy.com
alias uptimemadeeasy.com website
address uptimemadeeasy.com
hostgroups webservers
retry_check_interval 2
contact_groups admins
notification_interval 15
notification_period 24×7
notification_options d,u,r,f,s
notifications_enabled 1
}
and below the host definition in the same file we put our service definitions:
define service{
use generic-service
host_name uptimemadeeasy.com
service_description ssh
check_command check_ssh
check_period 24×7
check_interval 5
max_check_attempts 3
normal_check_interval 3
retry_check_interval 2
contact_groups admins
notification_interval 60
notification_period 24×7
notification_options w,c,u,r
notifications_enabled 1
}define service{
use generic-service
host_name uptimemadeeasy.com
service_description http
check_command check_http
check_period 24×7
check_interval 5
max_check_attempts 2
normal_check_interval 5
retry_check_interval 1
contact_groups admins
notification_interval 15
notification_period 24×7
notification_options w,c,u,r
}
With all of that done. We should be ready to verify our configuration is correct, restart the nagios service and login to see the definition.
Verify the Nagios Configuration:
/usr/local/nagios/bin/nagios -v /usr/local/nagios/etc/nagios.cfg
Be sure that there are no errors or warnings in the check. Then, restart Nagios:
/sbin/service nagios restart
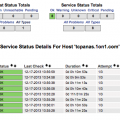
Now let’s login and check out our host and it’s services:

We have now defined one host with its two services.
You can see that Nagios is able to successfully check the services we defined and they end up green with an OK status.
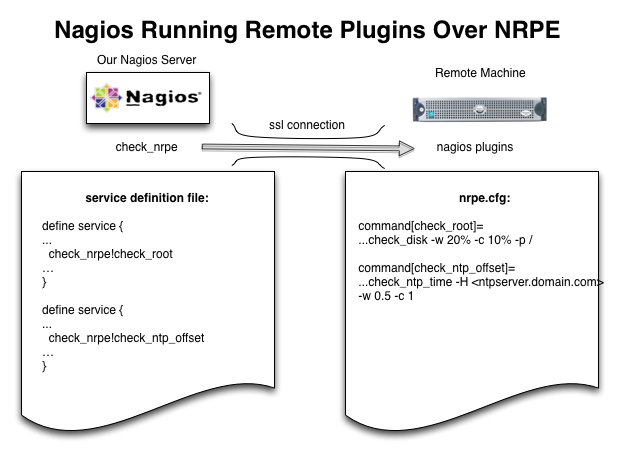
Next week, we will discuss using NRPE to perform checks through plugins on a remote system in the article: Nagios Remote Plugins with NRPE
Latest posts by Jeff Staten (see all)
- Configure Your HP Procurve Switch with SNTP - May 5, 2015
- Configuring HP Procurve 2920 Switches - May 1, 2015
- Troubleshooting Sendmail - November 28, 2014
Hi
I m trying to add 2 windows servers to Nagios monitoring server. I was able to add 1 server, but when i trying to add 2nd server, getting an error. please help me, how should be the second windows configuration file(second_windows.cfg)
Krishna,
The error you get would be helpful, but if the first worked fine and the second failed, verify that the host_name and alias fields are unique and then try again.
Jeff