There are some things in life that don’t make any difference to you when everything is good. But suddenly make you happier when there is a problem. For me, DynECT Managed DNS traffic management is one of these. It doesn’t matter when things are good, but when there is a problem with one of your nodes and everything auto-magically fails over to the other node and your website stays up, then I am happy.
Setup DynECT Dynamic DNS
I was supporting a very important website and to protect myself from downtime, I worked with the engineers to architect it so that I could have 2 independent nodes or servers at different geographic locations serve the webpage. the idea was, if one goes down, automatically send all traffic to the other one. To manage the traffic, I used DynECT’s DNS service. This is how I did it.
DynECT Traffic Management Tour
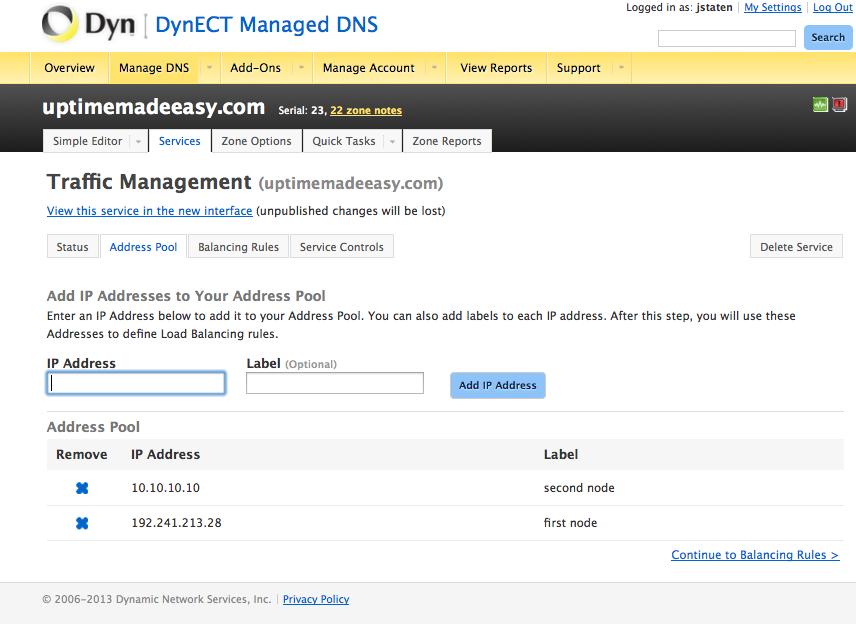
Let me show you how it works. Below is the management interface for my DynECT Managed DNS account. I have setup 2 nodes in my address pool.
- first node – 192.241.213.28 – the real IP address for my website. This one will be the node that is up in our tutorial.
- second node – 10.10.10.10 – obviously a private address that will not work. This gives me a way to show a down node.
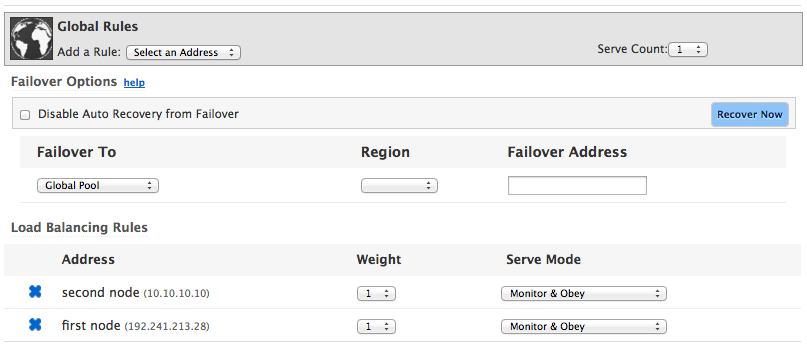
The next thing we do is setup our global pool. We put both of our nodes in the global pool and give each node equal weight. Finally, we choose from among the 4 serve mode options:
- Always Serve – This sets the node to always be served whether it is up or not.
- Monitor & Obey – This tells the DynECT Traffic Management Service to monitor the node and if it is down, not serve this node and if it is up to serve this node.
- Monitor and Remove on Failure – This tells the DynECT Traffic Management Service to serve the node until there is a problem with the node, and then remove it from the service when there is a problem.
- Do Not Serve – This option just tells the DynECT Traffic Management Service to not serve this node. No traffic will be sent to it.
I choose the Monitor & Obey option for obvious reasons. When the node is up, traffic will be able to be sent to it. When it is down, no traffic.
Next, we setup the node we wish to use on a region by region basis. DynECT carves up the globe into 7 regions: US West, US Central, US East, EU West, EU Central, EU East, and Asia. All traffic in the world is handled by one of these regions.
Below, you can see that I have configured the US West region to use my “first node”, but to failover to the global zone’s rules if there is a failure in my US West region’s nodes.
You can see that I put our good node in this region. If I put more than one node in each region, it would send traffic to each based on the weight given to each node. Because there is only one node configured in this region, If there was a problem with the “first node”, the region would failover to the status in the global zone.
Our US Central zone is configured below. Everything is setup like the US WEST region above except we have it configured to serve the “second node” instead.
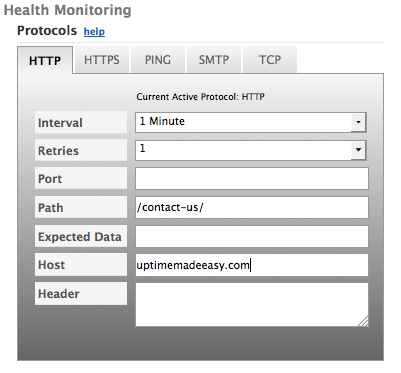
We have configured our Traffic Management service Health Monitoring to check every 1 Minute to load the http://uptimemadeeasy.com/contact-us/ page on both nodes. If it fails for one of the nodes, then the failover rules will be followed.
In this example, because we configured an invalid node, the check has failed for that node and all traffic goes to the good node.
When you configure your webpage to use DynECT Managed DNS Traffic Management, you have complete control of which region’s traffic makes it to which of your nodes. If you have web pages that require a stateful connection to the web server to operate properly or if you are using multi-paged forms, you will want to either configure a longer TTL or configure single nodes per region with all of your nodes in the global pool. If it doesn’t matter if your traffic gets bounced from one node to the other, you will want to put all nodes in each of the region pools.
Latest posts by Jeff Staten (see all)
- Configure Your HP Procurve Switch with SNTP - May 5, 2015
- Configuring HP Procurve 2920 Switches - May 1, 2015
- Troubleshooting Sendmail - November 28, 2014





Does this work for other types of servers (and traffic monitoring)? If so, this would be a neat way of automatically pointing remote users to a failover terminal server in case of an outage.
Yes. It really isn’t specific to any type of host. Remember this is a DNS service and therefore not just a web-DNS service.
The Health Monitoring has specific tests for HTTP, HTTPS, PING, SMTP, or TCP. I imagine that you could define nearly anything in the TCP Health Monitoring tab.