What is NTP?
NTP (Network Time Protocol) is the time protocol that most servers in the world use to keep in sync. Most companies will have a local NTP server that they keep in sync with an external timing source and then they have all of their internal servers sync their time with that machine.
Set Your Timezone First
Before we go off and setup NTP for your server, we should probably verify the timezone that your system is using first. We can easily check it by running the “date” command:
| $ date Tue Oct 8 16:31:53 MDT 2013 |
If your timezone isn’t what you were hoping it to be, you can set your timezone by changing a few files around. We will first backup our /etc/localtime file and then put in the one that has our timezone configured. In my case, I am using Mountain time, but you can get the proper file from /usr/share/zoneinfo. Browse through the subdirectories in there and choose the one that represents your region the best and put it in place like I did below:
| mv /etc/localtime /etc/localtime.bkp cp /usr/share/zoneinfo/America/Denver /etc/localtime |
Now verify that you set it properly again with the date command like we did above.
Install and Setup NTP on CentOS Linux
Now that our machine has the correct timezone, let’s sync the time with an NTP server.
Step 1 – Install the NTP packages
Install NTP with yum:
| # yum install ntp Loaded plugins: fastestmirror, refresh-packagekit Loading mirror speeds from cached hostfile …================================================================================ Package Arch Version Repository Size ================================================================================ Installing: ntp x86_64 4.2.4p8-3.el6.centos base 444 k Installing for dependencies: ntpdate x86_64 4.2.4p8-3.el6.centos base 58 kTransaction Summary ================================================================================ Install 2 Package(s)Total download size: 502 k Installed size: 1.2 M Is this ok [y/N]: y Downloading Packages: (1/2): ntp-4.2.4p8-3.el6.centos.x86_64.rpm | 444 kB 00:00 (2/2): ntpdate-4.2.4p8-3.el6.centos.x86_64.rpm | 58 kB 00:00 ——————————————————————————————————————— Total 416 kB/s | 502 kB 00:01 Running rpm_check_debug Running Transaction Test Transaction Test Succeeded Running Transaction Installing : ntpdate-4.2.4p8-3.el6.centos.x86_64 1/2 Installing : ntp-4.2.4p8-3.el6.centos.x86_64 2/2 Unable to connect to dbus Verifying : ntp-4.2.4p8-3.el6.centos.x86_64 1/2 Verifying : ntpdate-4.2.4p8-3.el6.centos.x86_64 2/2Installed: ntp.x86_64 0:4.2.4p8-3.el6.centosDependency Installed: ntpdate.x86_64 0:4.2.4p8-3.el6.centosComplete! |
Our NTP package is now installed. Let’s set it to startup at boot time:
| # chkconfig ntpd on [root@obelix ~]# chkconfig –list ntpd ntpd 0:off 1:off 2:on 3:on 4:on 5:on 6:off |
Step 2 – Choose NTP Servers to Sync With
Now that we have the prerequisites done, we need to choose at least one NTP file to sync with. As I mentioned in the opening above, most organizations will setup one local server to sync its time with an external system, then all of the internal machines will sync with it. The decision is easy if you have an internal system already configured, but if you are setting up the first system in your environment, then you need to find an external source to sync your machine with.
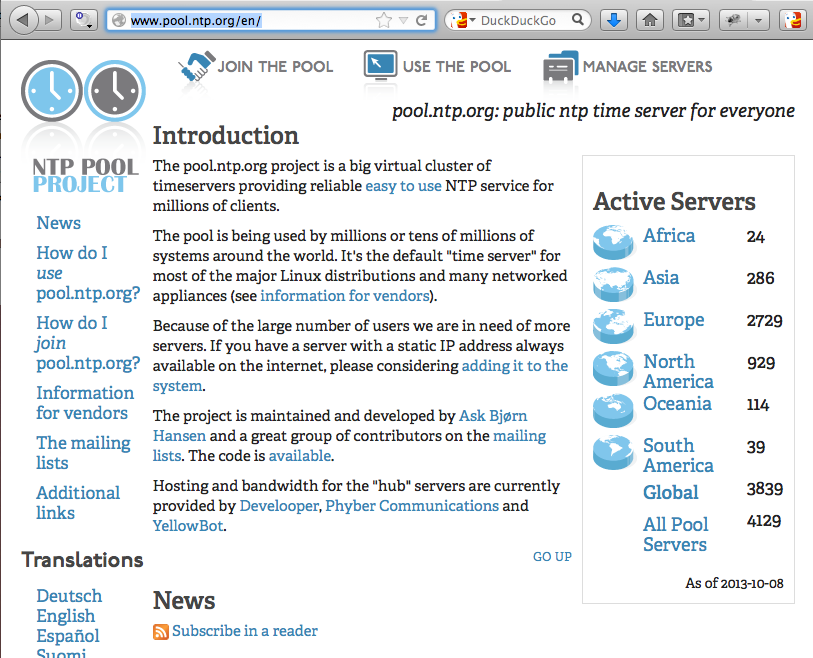
There are many options to choose from one of which is from NTP Pool Project which you can find at http://www.pool.ntp.org/en/.
You can get the list of servers for your geographical region by clicking on your region on the right hand side of their webpage.
Since I am in North America, I found the following server pools at http://www.pool.ntp.org/en/:
0.north-america.pool.ntp.org
1.north-america.pool.ntp.org
2.north-america.pool.ntp.org
3.north-america.pool.ntp.org
So, I need to add these lines to the /etc/ntp.conf file:
| # cat >> /etc/ntp.conf <<EOF server 0.north-america.pool.ntp.org server 1.north-america.pool.ntp.org server 2.north-america.pool.ntp.org server 3.north-america.pool.ntp.org EOF |
And add these lines to the /etc/ntp/steptickers file:
| # cat >> /etc/ntp/step-tickers <<EOF 0.north-america.pool.ntp.org 1.north-america.pool.ntp.org 2.north-america.pool.ntp.org 3.north-america.pool.ntp.org EOF |
After adding the lines to these files, we need to restart restart the NTP daemon:
| # service ntpd restart Shutting down ntpd: [FAILED] Starting ntpd: [ OK ] |
That should be enough to get our machine to begin syncing with these servers. It can take 5 minutes or so for the NTP daemon to sync. Wait 5-10 minutes and then verify that it took. You can check by running the date command and verifying that it is correct:
| # date Tue Oct 8 16:16:10 MDT 2013 |
You can also run the ntpdate command against the pool that you choose:
| # ntpdate -db 0.north-america.pool.ntp.org 8 Oct 16:19:30 ntpdate[31940]: ntpdate 4.2.4p8@1.1612-o Fri Feb 22 11:23:28 UTC 2013 (1) Looking for host 0.north-america.pool.ntp.org and service ntp host found : web1.amdgtechnology.net transmit(50.97.210.169) receive(50.97.210.169) server 50.97.210.169, port 123 stratum 2, precision -23, leap 00, trust 000 refid [50.97.210.169], delay 0.02785, dispersion 0.00000 transmitted 4, in filter 4 reference time: d5feff90.6bc3aaf4 Tue, Oct 8 2013 16:02:56.420 originate timestamp: d5ff0373.4db562e3 Tue, Oct 8 2013 16:19:31.303 transmit timestamp: d5ff0373.4da5e00e Tue, Oct 8 2013 16:19:31.303 filter delay: 0.02795 0.02785 0.02788 0.02791 0.00000 0.00000 0.00000 0.00000 filter offset: -0.00091 -0.00093 -0.00094 -0.00093 0.000000 0.000000 0.000000 0.000000 delay 0.02785, dispersion 0.00000 offset -0.000939 |
You can see that the offset is now a very microscopic portion of a second difference between my machine’s time and the NTP server at ntp.org.
Troubleshooting NTP
If your server doesn’t ever sync up with the NTP server pool, there are some things you can do to try to identify the problem. Often the problem is due to a firewall on the server. You can try shutting down the firewall for a moment and seeing if it works. Verify that you don’t have any typographical errors in the files that we edited. You will also want to verify that your DNS is working fine and that the machine can resolve the hostnames of the NTP servers.
Checking that Your Server Recognizes its Config
Frequently, you think that you’ve done everything above correctly and you just want to verify that it read the /etc/ntp.conf correctly. You can verify this by using the ntpdc command. ntpdc will tell you how your ntp service is configured including telling you which machine it is configured to contact for ntp updates.
# ntpdc -l   ( -l parameter lists all of the peers known to the server. )
client clock1.albyny.inoc.net
client bitdonut.co
client ntp2.h.vporn.com
client x.ns.gin.ntt.net

# ntpdc -p    ( -p prints a lists of known peers as well as a summary of their state. )
     remote           local      st poll reach  delay   offset    disp
=======================================================================
*clock1.albyny.i 192.241.213.28   1 1024  377 0.08350 -0.003566 0.13672
=bitdonut.co     192.241.213.28   3 1024  377 0.06804 -0.008990 0.12183
=ntp2.h.vporn.co 192.241.213.28   2 1024  377 0.05376 -0.012095 0.13669
=x.ns.gin.ntt.ne 192.241.213.28   2 1024  377 0.00182 -0.003281 0.13670
Additionally, ntpdc has both a debug and an interactive mode to help you get your hands deep into testing your ntp configuration.
Use Tcpdump to Watch the Traffic
Another good troubleshooting technique is to watch the traffic destined for the typical ntp port (123/tcp) going out from your server. In the example below, I installed tcpdump and then ran it and was able to see my machine query ntp servers and then receive responses back from those servers:
| # tcpdump dst port 123 tcpdump: verbose output suppressed, use -v or -vv for full protocol decode listening on eth0, link-type EN10MB (Ethernet), capture size 65535 bytes 22:05:39.654502 IP myserver.ntp > 199.30.140.74.ntp: NTPv4, Client, length 48 <– NTP query 22:05:39.663888 IP 199.30.140.74.ntp > myserver.ntp: NTPv4, Server, length 48 <– NTP response 22:05:40.655047 IP myserver.ntp > services.quadranet.com.ntp: NTPv4, Client, length 48<– NTP query 22:05:40.664994 IP services.quadranet.com.ntp > myserver.ntp: NTPv4, Server, length 48<– NTP response |
Latest posts by Jeff Staten (see all)
- Configure Your HP Procurve Switch with SNTP - May 5, 2015
- Configuring HP Procurve 2920 Switches - May 1, 2015
- Troubleshooting Sendmail - November 28, 2014


